Hello world! - Your first template
Make your first SPX template from scratch.
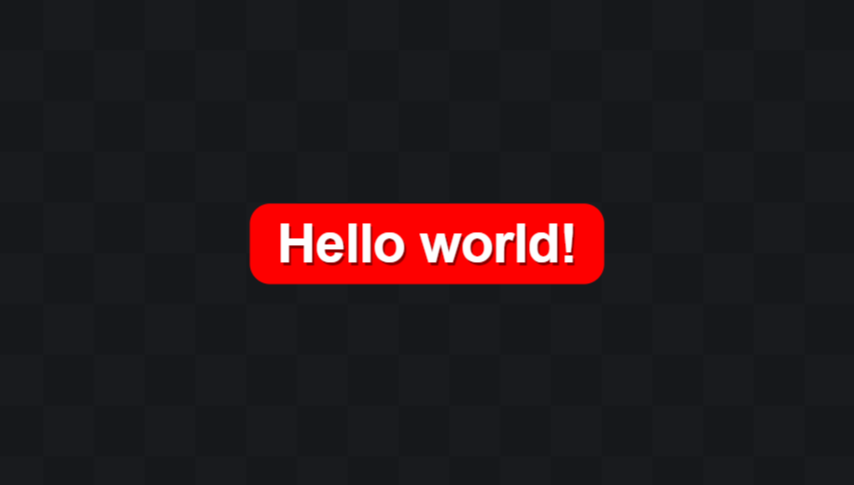
This article will give you basic understanding about HTML templates in SPX. As a hello world -exercise we create a simple one liner title graphic as shown below.
What you need?
- Windows, Mac, or Linux computer
- SPX application installed to it (spx.graphics/download)
- A text editor (MS Visual Studio Code is recommended, but any plain text editor will work. Do not use a word processor, such as MS Word!)
Prepare empty files
Go to your SPX install folder and into ASSETS/templates -subfolder. Create a new folder (for all your future templates) using your (or your company) name. Then in your personal folder create a new subfolder for your new template. The recommended folder structure follows this principle
<SPX-FOLDER>/ASSETS/templates/<authorName>/<templateProjectName>/
so in my case, it would be C:/SPX/ASSETS/templates/tuomo/helloWorld/
Then create three empty files in there:
- helloWorld.html (the template file itself)
- styles.css (CSS stylesheet for visual styles of elements)
- spx_parse.js (Javascript helper file)
If you are in a hurry, you can download tutorial files from MyFirstTemplate.zip.
HTML file content
The HTML template files for SPX can have any HTML tags and features, but they usually follow this basic structure:
Using this as our guidelines, we can start to create a very basic SPX-template with this HTML-code. Please note, this is not working code since it is lacking important javascript funtions, but outlines the basic HTML element part of the template.
<html>
<head>
<meta charset="utf-8" />
<title>My First SPX Template</title>
</head>
<body>
<div class="SPXWindow">
<div id="f0"></div>
</div>
</body>
</html>
The SPXWindow -class and other styles are defined in styles.css -file which we assign to HTML template later. An important value in the HTML is element with ID "f0", this will be the text the user can update from SPX Template Editor.
Template Definition
The link between the HTML file and SPX user interface is a javascript object, which defines how the template should be played out and what kind of input fields are exposed for the user in SPX's user interface.
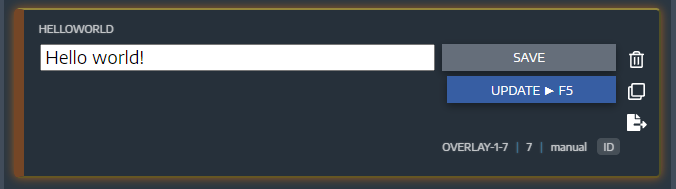
In this template, we will only have a single text field, so our template definition can look like the following. (For details see documentation)
<script>
window.SPXGCTemplateDefinition = {
"description": "My first template",
"playserver": "OVERLAY",
"playchannel": "1",
"playlayer": "7",
"webplayout": "7",
"out": "manual",
"uicolor": "2",
"DataFields": [
{
"field" : "f0",
"ftype" : "textfield",
"title" : "Message",
"value" : "Hello World!"
}
]
};
</script>
Link external JS and CSS files
CSS stylesheets defines colors and fonts and other visual parameters for HTML elements. In this example we use CSS transitions to fade our text on and off. There are a ton of options how to animate items, but a simple fade will do for this exercise. We have two classes to help in this: fadeIN and fadeOUT. Then the javascript will toggle these CSS classes with play and stop events.
A snippet from the CSS style:
.fadeIN {
opacity: 1 !important;
transition: all;
transition-duration: 0.5s;
}
.fadeOUT {
opacity: 0 !important;
transition: all;
transition-duration: 0.2s;
}
External CSS and JS files are linked to HTML with these directives in the <head> section:
<link rel="stylesheet" href="./styles.css">
<script src="./spx_parse.js"></script>
You can download the external files from here:
styles.css - an example stylesheet for Hello World -example
spx_parse.js - an example SPX data parser
SPX command handlers
The spx_parse.js file introduces play() and stop() functions, but they trigger runAnimationIN() and runAnimationOUT() functions which needs to be implemented in the template. Once these are done, the template is completed and can be added to SPX in Project Settings and then it can be added to the rundown for testing.
Complete HTML template code
You can copy and paste the HTML code from below or download helloWorld.html file here.
<!DOCTYPE html>
<html>
<head>
<meta charset="utf-8" />
<link rel="stylesheet" href="./styles.css">
<script src="./spx_parse.js"></script>
<title>My First SPX Template</title>
<script>
function runAnimationIN() {
// basic animation by swapping the CSS class
document.getElementById('f0').classList = "fadeIN"
}
function runAnimationOUT() {
// basic animation by swapping the CSS class
document.getElementById('f0').classList = "fadeOUT"
}
</script>
<script>
window.SPXGCTemplateDefinition = {
"description": "My first template",
"playserver": "OVERLAY",
"playchannel": "1",
"playlayer": "7",
"webplayout": "7",
"out": "manual",
"uicolor": "2",
"DataFields": [
{
"field" : "f0",
"ftype" : "textfield",
"title" : "Message",
"value" : "Hello World!"
}
]
};
</script>
</head>
<body>
<div class="SPXWindow">
<div id="f0"></div>
</div>
</body>
</html>
SPX comes with several default templates. See ASSETS/templates -folder structure for more examples.
Import errors and messages
When HTML files are added (or "imported") to the SPX project they are scanned for the TemplateDefinition -data.
Some templates may generate errors or other log messages to the SPX Server console during import. These errors usually can be safely ignored.
Errors and messages are generated when the template is parsed for the template definition. Typical causes for these are Javascript functions that are executed "onLoad". Usually these messages can be ignored, but if they prevent the import of the template, or crash the SPX server, please read the error messages carefully and see the template source code if those root functions could be temporarily disabled. After the import, they can be re-activated for runtime.