SPX Social
Social media messages for live productions
SPX Social is a premium extension for SPX that enables the playout of live messages from multiple social media platforms or other external data sources.
See SPX Social in the Store.

- Purchase the extension from SPX Store
- Get the license (see instructions)
- Install SPX Social plugin and templates
- Setup a Flockler account (optional)
- Configure SPX Social
1. Get SPX Social extension
Go to SPX Store and get the extension. While the product is in BETA stage our documentation and other support material are limited and for this, we offer a free support session for installation and configuring the extension.
After purchase you will be able to download manual installers (zip package for Mac and Linux), a Windows installer (exe), and a support document (pdf) that has instructions for booking a 45-minute support session for installing SPX Social and setting up social message aggregation using Flockler (https://flockler.com/free-trial).
PLEASE NOTE: SPX Social requires SPX v.1.1.2 or newer.
2. Get the license
SPX Social extension runs in a restricted "DEMO MODE" once installed. We will supply a license string after purchase and this will be added to the configuration file of SPX Social and this will remove all licensing messages and other functionality restrictions.
If you have purchased SPX Social but have not received the license for it yet, please contact us or use the chat feature on this page. Please have your SPX HOST-ID and SPX Store Order number ready. For instruction see this article.
3. Install
For Windows-based computers, the SPX Social extension comes as an installer that will install both the SPX Social extension and required graphics templates to the correct folders within SPX.
For Mac and Linux machines, the files must be extracted from the given zip file to the correct locations. Zip file contains a plugins folder and the spxSocial -subfolder will need to be extracted to SPX/ASSETS/plugins/spxSocial -subfolder. The graphic templates are in templates -subfolder and that will need to be extracted to SPX/ASSETS/templates/softpix/spxSocial -subfolder.
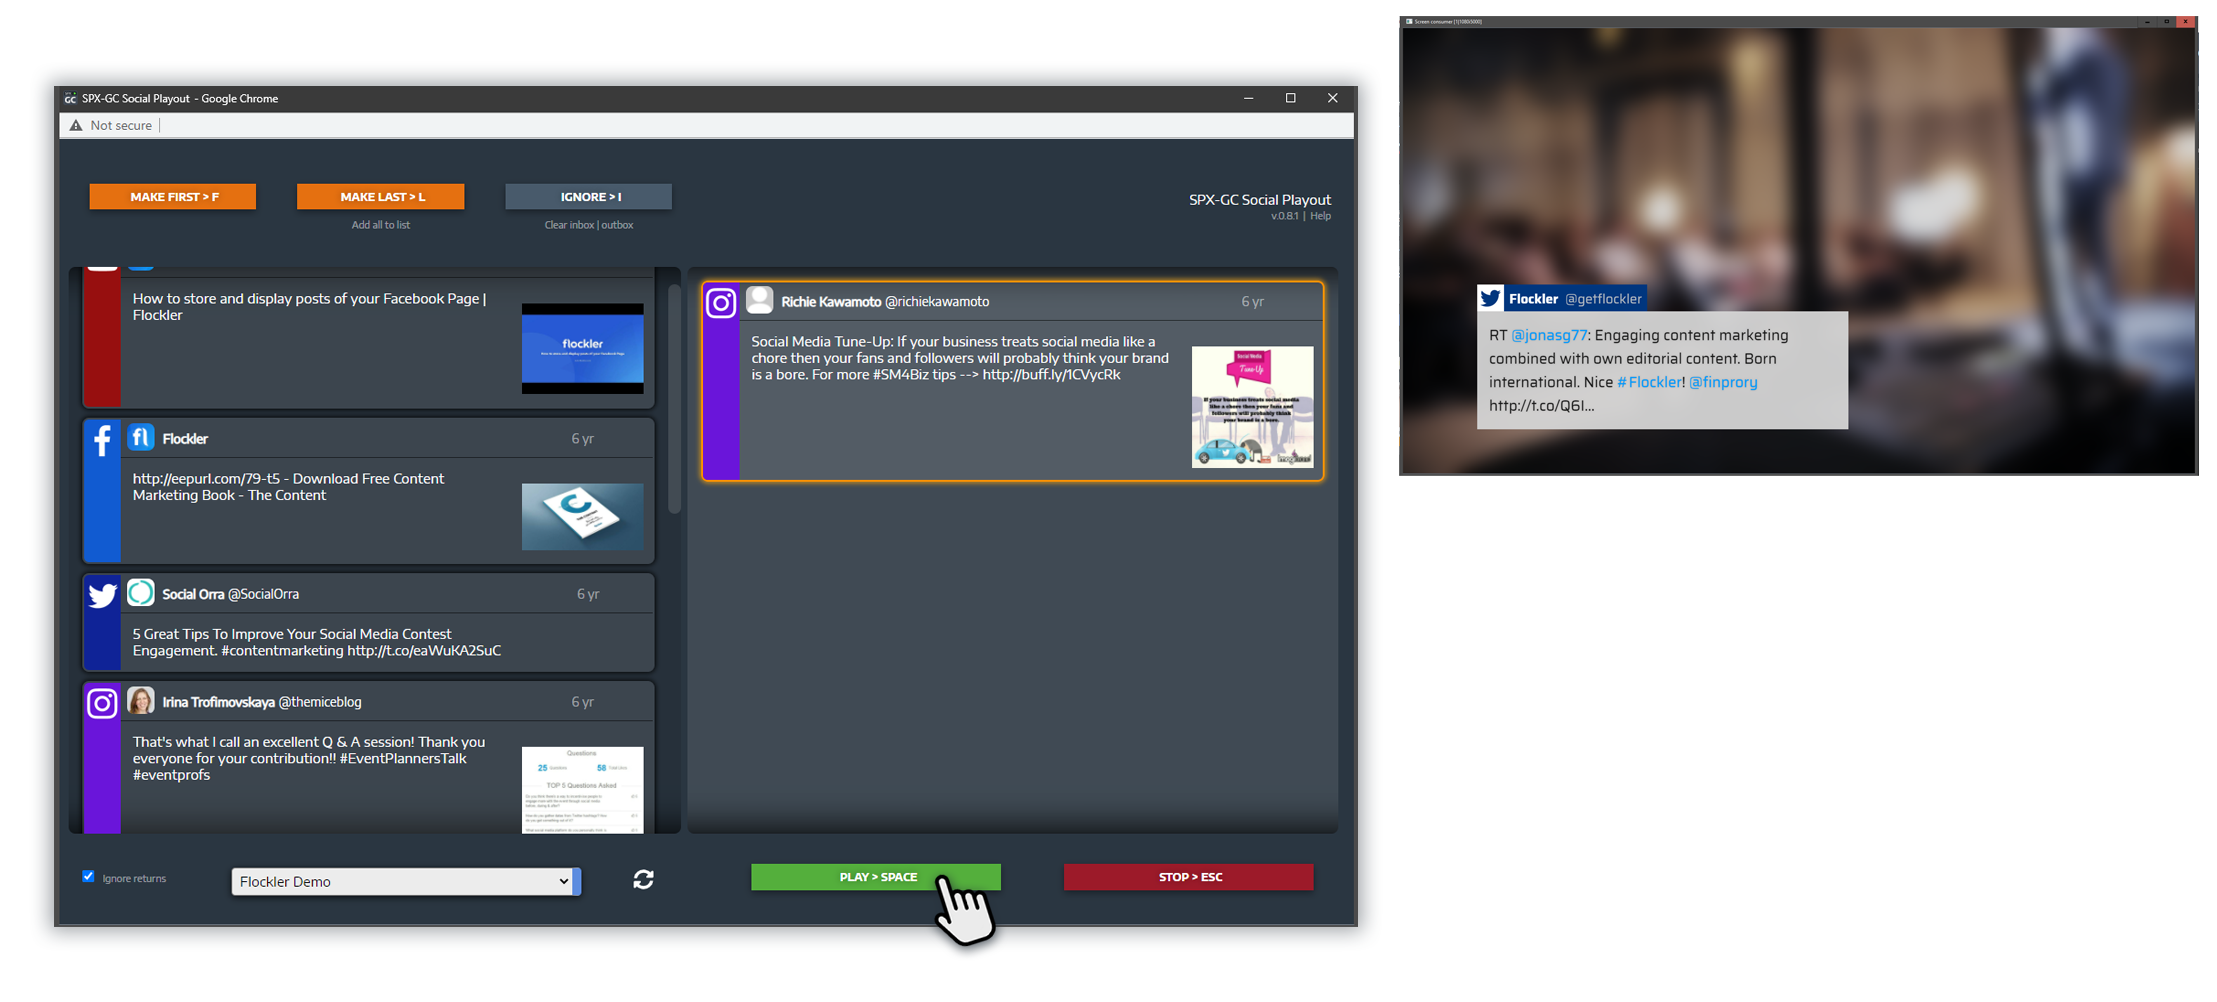
The extension comes with three SPX graphics templates:
- Social Lower Third
- Social Side Panel
- Social Center Box
All templates can be configured with custom colors and fonts and these templates can work as a starting point for the development of completely customized graphics with your look&feel. Remember, if you need custom designs our Creative Services can help!
4. Create a Flockler account and define sources
Flockler (https://flockler.com/free-trial) is an aggregation service for collecting content from various social media sources into a single feed that can then be integrated easily with SPX Social.
Your Flockler account will have a numerical "site-id" and collected content can optionally be published into "sections".
Refer to Flockler's instructions and help, but follow these basic steps to create a working Flockler data source for SPX Social.
- Create an account with Flockler
- Create a few sections, for example, Post, youtube, #keyword, etc
- Created automated feed for example Twitter, YouTube, and TikTok under wanted sections
- Note: Facebook/Instagram requires that you have a Facebook business account

When creating new "automated feeds" you should most often use Flockler's "Display automatically" option as opposed to "Save for moderation" option. This will "auto approve" all aggregated content and they will load to SPX Social's inbox for playout. If several layers of moderation are required, then Flockler's user interface can naturally be used as a "pre-moderation" tool.
RSS and other data sources
By default SPX Social comes with two data source modules:
Flockler - for utilizing several social media platforms via Flockler integration (Twitter, Youtube, Facebook, Instagram, LinkedIn, TikTok etc)
RSS - for utilizing any RSS feed as a data source for SPX Social. Some RSS feeds may be secured with CORS (Cross-Origin Resource Sharing) option which will prevent reading the content to SPX Social directly over a URL. To work around this issue, the SPX server has a built-in proxy that can read the content and serve that to SPX Social. To use the CORS secured RSS feed, pass the URL to the feed proxy API endpoint using the syntax as shown with this example:
OTHER datasources can be added to SPX Social using it's plugin module architecture. If you need other datasources to be integrated with SPX Social contact us.
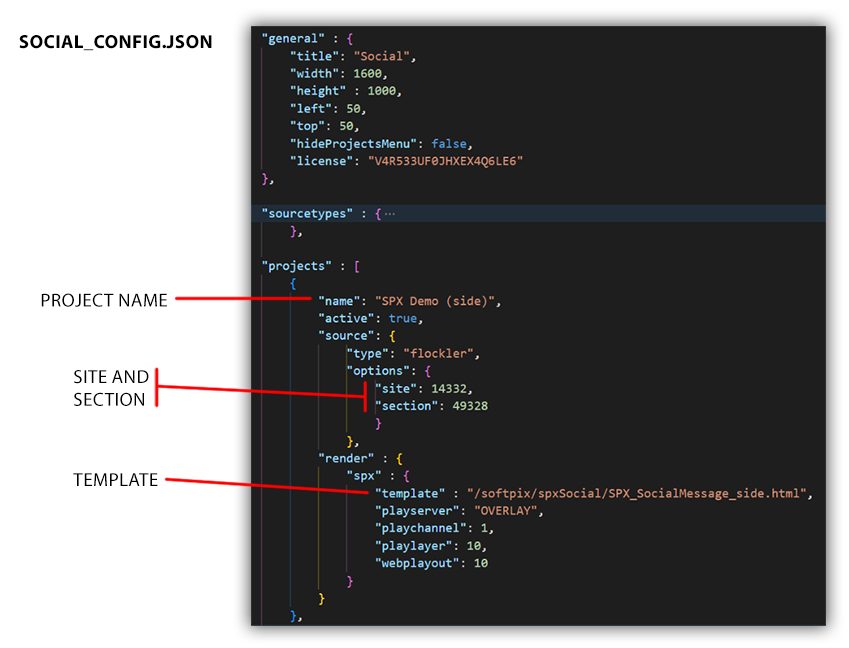
5: Configuration JSON
SPX Social does not have a graphical userinterface for changing setting, but a social_config.json -file that controls how the application works, what data sources to read content from, and how the graphics should play out using the SPX server.
The configuration file is divided into several main sections:
GENERAL has global settings such as the default window size/position. hideProjectsMenu can be used in situations where it is not advisable for the social playout person to be able to change project (by mistake) during production.
SOURCETYPES section introduces available reader modules. By default, this contains flockler and rss -types. More can be added later.
PROJECTS is an array of objects that define several "SPX Social Projects", each containing source and render settings among other things. The source is typically of type "flockler" which requires site and (optionally) section parameters. The render is of type "spx" and parameters can be given to specify which template is used for playout. CasparCG playserver, playchannel and playlayer can be defined. Web playout uses webplayout parameter.
Join SPX Discord server and discuss SPX Social related topics in the #spx-social channel.